Posts

How to hide page from internal site search in Shopify

Image
If you don't want a page or a product in Shopify to show in internal search results you can use the metadata. I use  metafieldseditor  - in the following fields you need to write these values: "namespace" : "seo" "key" : "hidden" "value" : 1 "value_type" : "integer" You are all set. Your product will no longer show up when someone searches for it in your shop’s search bar. As an added benefit, this metadata will also add a ‘noindex’ tag to your page, preventing Google from adding it to its search index if it happens to stumble across it.
Newsletter signup Shopify change to Mailchimp

Image
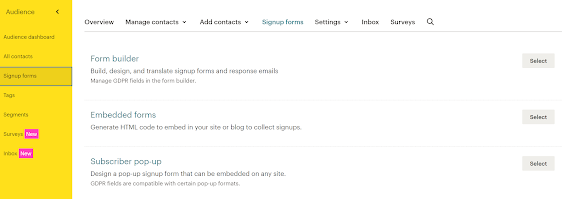
We have a Shopify store with Newsletter signup at the end of the page. I was testing it the other day and realized it did not work - the signups did not go anywhere. I searched Google and found out that Shopify recently added an extra layer of Captcha protection which has caused the Newsletter signup forms in some themes (like Paralaxx) to stop working. I disabled the CAPTCHA and then started getting more spam from the Contact Us form. That is when I made a decision to switch to Mailchimp.  First, you need to go to Mailchimp Audience (the one you want people to subscribe to) and choose Signup Form - Embedded. Create a form you would like to have on your site and Copy the code. Then go to Shopify - Themes - Customize - Footer and then paste Mailchimp code to Custom HTML script box. MailChimp allows you to embed a form into your site, but the "Submit" button often doesn't appear by default because of how their code generator works. In older versions of templates, in order ...

How to export issues, backlog to file in Jira Next-Gen software project

Image
I am using Jira next-gen for my project and I created a backlog (roadmap) and the board. My developers found it is time-consuming to go thru each of the items, click on the issue, comment then click on another one.. They wanted to see all of them in the file. Apparently it is not very straightforward and I wish Jira developers simplified it by making an Export button at the top of the right corner. Here is how to do it.  When you are in the Next-Gen Project go to Filters - Advanced Issue Search Add caption Then filter for what you would like to export and then in the upper right corner click on Export button and choose what format you would like.

Disable jumping to the middle of page on Read More Wordpress

When I inserted Read More tag in my WordPress site blog entries then the blog post opens in the middle of the page so reader left wondering what the beginning of the page is. After researching on internet I found a solution from HostPapa . Go to your Word Press Back End Dashboard - Appearance - Theme Editor and locate function.php in Them Files. Then add the following code at the beginning of the function.php file - I added at the end and it didnt work. Then I added the following function to disable showing post in the middle: function remove_more_link_scroll( $link ) { $link = preg_replace( '|#more-[0-9]+|', '', $link ); return $link; } add_filter( 'the_content_more_link', 'remove_more_link_scroll' ); at the beginning of the function.php file after the following: <?php if ( ! function_exists( 'shoreditch_setup' ) ) : And hurray! It worked!

How to underline hyperlink on hover wordpress and change hyperlink color

My WordPress template has hyperlinks similar to the regular text so you cant say that it is a hyperlink.  To change a color go to Dashboard - Appearance - Customize. Then put this code: a {   color: #0070c9 } To underline link on hover: a:hover {   text-decoration: underline }

ADDITIONAL INFORMATION Order notes (optional) e-commerce change text

Image
After searching the internet on possible solutions including paid plugins I found a great free plugin Flexible Checkout Fields plugin .  To change the words from Notes about your order, E.G. special notes for pickup go to Dashboard - WooCommerce - Checkout Fields - Order - Edit Section - Section Fields. Expand the field go to Appearance and change the text in the Placeholder tab.

How to fix error: You must upload a .wie file generated by this plugin.

I bought a theme with a demo widgets in .WIE file format. I got  Widget Importer & Exporter plugin in order to do that. But when I tried to upload a file it gave me an error: You must upload a .wie file generated by this plugin. I did research and found out that sometime MIME check prevents uploads and a workaround to disable it. I used Disable Real MIME Check plugin. This plugin is a workaround that disables the recently introduced strict MIME check to restore the upload functionality. And it worked like a charm.

How to increase Word Press memory limit

Image
I was trying to build a template with Elementor Pro and integrate it with the Knowledge Base/Wiki plugin. Every time I try to use it I get a  '   Preview Could Not Be Loaded' Error. I de-activated the plugin and Elementor preview worked without problems.  I went to Elementor - Tools and enabled Debug bar. When I tried to create a template and saw the error again I chose to debug and saw the message:  Fatal error: Allowed memory size of 67108864 bytes exhausted (tried to allocate 72 bytes). Plugin developer recommended to: -  Open  wp-config.php , which is located in the root WordPress directory. - At the end of the file, add the following line: define('WP_MEMORY_LIMIT', '256M'); Save your changes.  Usually, this method solves the issue but in this case, I continued to get the same fatal error message.  After research, I found another method - to add the line in php.ini file. In my case my hosting provider had php.ini file in Contr...

Show Prices On Frontend When Product Is Sold Out Shopify (Parallax template)

My company is using Parallax theme from Shopify and by default, it does not show prices if the product is sold out. In order to display the product price in sold-out products on product pages you have to do the following: In your admin end go to Themes - Actions - Edit Code . Then go to Sections and choose product-template.liquid. Find {% if variant.available == false %}{{ 'products.product.sold_out' | t }}{% endif %} And replace it with this:  {% if variant.available == false %}{{ 'products.product.sold_out' | t }}{% endif %}  {{ variant.price | money }}

Adding tables to wordpress

Image
I needed a free simple table plugin for my wordpress site and I found TablePress plugin. TablePress allows you to easily create and manage beautiful tables. You can embed the tables into posts, pages, or text widgets with a simple Shortcode. I installed it and it was easy to create and use tables. To create a table go to dashboard and you see it there: Then you can add a table and specify the number of columns and rows. To adjust column width you go to TablePress Plugin option and insert the code for the specified table (each table has its' own number. The developer describes how to do it here . I decided to go with %% instead of pixels since when you specify pixels the table is not responsive any more. When you use percentage then the table will be responsive and fit on any mobile device.

Redirect only homepage of your website

Image
I had a website where I wanted to redirect just home page. I needed all other pages to be at the original domain address. I put the following line in the .htaccess file RedirectMatch ^/$ http://aaaaa.com where "aaaaa.com" is your home site I use WinSCP - FTP and SFTP client for windows. I couldn't see .htaccess file because it was hidden. In order to see it I went to Options - Preferences - Panel - Show Hidden Files If you have any other client or go thru cPanel and don't see .htaccess file then make sure you enable "hidden files" viewing in these tools.

Installing Dream Spa theme from Theme Forest on Wordpress

I had recently bought a Dream Spa template for my WordPress site to create a site for my salon. I installed it thru WP site. I went to: Admin - Appearance - Themes - Add New - Upload. They offer two .zip packages for installation  - one is installable WordPress only and another is with installation package and all documentation. Both are .zip files. I thought that the package with all the files is the best one and tried to install it. I got the following error: Theme is missing the style.css stylesheet error. The solution is to only install the installable WordPress package - here is a great HowTo from themeforest: Theme is missing the style.css stylesheet error Then I followed these instructions to upload a demo content to my site.

Resetting/Recoverring WordPress password through PHPAdmin.

Image
I installed a new Wordpress and then lost password. When I tried to recover it thru Wordpress web login it didn't let me. The recovery via email was disabled for my site. So I found a great tutorial on wordpress wiki and did it via PHPAdmin. his article is for those who have  phpMyAdmin  access to their database.  Note: use phpMyAdmin at your own risk. If you doubt your ability to use it, seek further advice. WordPress is not responsible for loss of data. Begin by logging into phpMyAdmin and clicking  databases . Image #2 A list of databases will appear. Click your WordPress database. Image #3 All the tables in your database will appear. If not, click  Structure . Look for  wp_users  in the Table column. Click on the icon for  browse . Locate your Username under user_login Click  edit  (may look like a pencil icon in some versions of phpMyAdmin) Image #4 Your user_id will be shown...

Clone move backup wordpress to another domain

I wanted to create a clone of my wordpress website to put it on a sub domain and play with it. So I was looking for the simplest solution and I found one. I used WPClone .  As they say on their website:  WP Clone is the easiest, fastest and most secure way to move or copy a WordPress site to another domain or hosting server. You can also use it to move your site to/from local server hosting, to create copies of your site for development or testing purposes, to backup your site, and to install pre-configured versions of WordPress. I installed WPClone as a plugin (Navigate to Plugins - Add New) and then activated it. Then I went to the plugin and backed up my site. After backing (automatically) it gave me a link which I copied. I then install a new WP site on my subdomain and installed WP clone plugin and activated it. After that I went to WP plugin on my new site and chose to restore. I pasted the link and it restored all my database, plugins, all i...

Blog Manager blogging platform extension for OpenCart Shoppica theme

Before choosing a blog platform you should analyze what features it needs to have - the ones are most important for you. We've implemented a free standard blog extension for an OpenCart and quickly realized that it lacks the following: - The author name - The following "Name" and "email" fields in the comments section - Notification for the blog administrator when somebody posts a comment - OpenCart search will work display blog results also So we tried a lot of different blogger extensions with these requirements in mind but most of them didn't work well with out existent template and needed a lot of work to get integrated with our current site.  So the one which worked right away with the Shoppica theme  with a minimal configuration was a Blog Manager  from Echo Themes. It has a very simple configuration.  Just one feature I miss - is the ability to have an author profile and ability to sort articles by the author.

How to add social buttons to Google sites facebook, twitter and linkedin

I created a Google site www.bacnetusergroupne.com and needed to add social share buttons so site visitors can share site pages with their social media or with other people. It's not a straightforward process unfortunately. Currently I integrated the following buttons: share/like on Facebook, twitter, Google+, LinkedIn To add LinkedIn I used these instructions  - worked like a charm. I reduced width from 250 to 150 so the gadget will be aligned left. To add Google + - go to the page where you want to place the button. Click on Edit . Then go to Insert - More Gadgets - and in the open box type Share . You will see Google + button. Then specify an URL to your webiste in the button configuration, choose parameters you want and you are done. To add Twitter - go to the page where you want to place the button. Click on  Edit . Then go to  Insert  -  More Gadgets  - and in the open box type  Twitter.  Specify screen name of your twitter acco...

Meta description for the site in WordPress

Image
Just googled my site today and realized the site description which shows up in the results is my last or even random post. And my SEO strategy basically is non-existent. So I decided to do something about it. This useful tutorial  outlines basic steps for SEO. I also decided to get their SEO plugin and currently used there pluging to set a Meta title . The Meta Description goes Meta description template box.

How to embed SWF flash movies into wordpress posts

I have a flash movie to show on my site and I was looking for the flash plugins. I tried Kimili but it didn't work - I think it's because I used a BulletProof security so it blocked access to this plugin on my pages. So I experimented with other plugins which will easily work with a BulletProof security. The one I had  success with is called Top Flash Embed This plugin allows to easily embed SWF Movies from Media Library or external SWFs into posts or pages through rich editor using shortcodes. What I did is just uploaded a flash file to my site's directory. Then inserted a code on the page in the following format with a link to the directory where my flash file is: [topswf swf='http://foo.com/flash.swf' width='350' height='200'] See result for yourself here .

Polylang points to a new directory 403 error no index file

I am using Polylang plugin for my bilingual site with En and Ru languages. Sometimes after several months of working my site when you started typing www.duotales.com redirected to www.duotales.com/en directory. And it showed an error that "No index file found". When I typed www.duotales.com/ru Russian version of the website was displayed without any problems. And if I clicked on the articles I could see them in English without any problems. The problem was with my homepage. I went to my WP directory with FTP and saw that a new folder En was created in my WP installation directory. And there was nothing in it. I deleted the directory then deactivated Polylang. When I activated it started working again. Also you can try to de-activate the plugin, delete it and install and activate again. It will fix this problem too.

Point domain name to a folder directory with WordPress

I installed my Wordpress site to a subdirectory in my root directory. The reason is that I don't clutter my root directory. So I was looking for ways to point my home site's URL (www.duotales.com) to a subdirectory where WordPress installation of this site is located. I used these steps outlined in this blog and it worked like a charm.  In your public_html folder (also called the “root html” folder), you need to create a file called .htaccess. From this file we are going to use a few lines to redirect those requests in a search engine friendly way. Add the following lines to that file: RewriteEngine On RewriteCond %{HTTP_HOST} ^(www.)?YourDomain.com$ RewriteRule ^(/)?$ blog [L] The only change you need to make is to change “YourDomain.com” to your domain. This will then redirect everything from the domain to the folder /blog at that domain. If you want to change that folder just edit the “blog” part. Also if you are looking how to move a root install...